User Guide Home >
Syncrify Client >
User Interface
User Interface
Once you have installed Syncrify Client onto your machine, the Client should automatically start. This chapter discusses how to navigate through Syncrify Client's graphical user interface, including information on its backup parameters, as well as how to restore files, folders, and profiles from Syncrify Server.
User Interface

A profile defines a set of backup conditions such as encryption and/or compression on a set of files and folders. See Admin, Users, & Profiles for additional information on Syncrify Profiles.
You must have X-Windows installed on Linux/Unix to use Syncrify client in GUI mode.
Configuring a Backup Profile
Following parameters must be specified before a backup is performed. This also verifies a successful connection between Syncrify Client and Server.
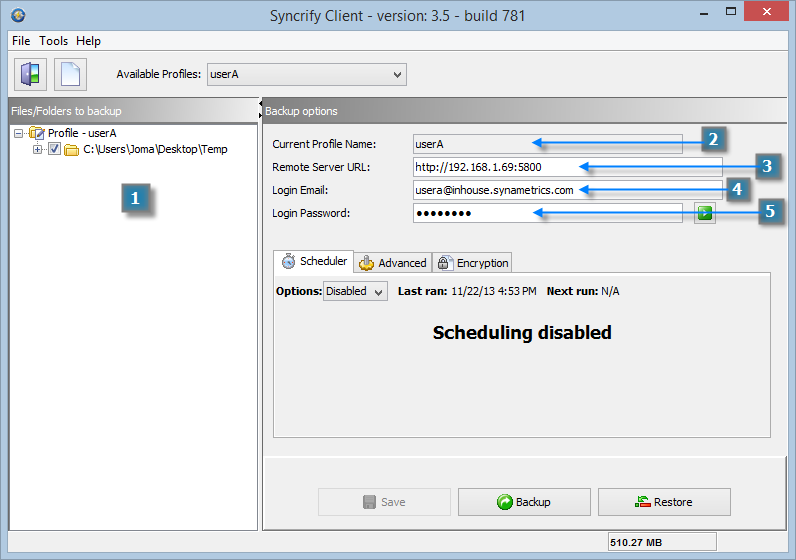
 Add files/folders to backup - This is done by one of two ways:
- Drag and drop a file into the left hand side of the user interface OR
- Right-click this section and select Add a folder/file in the pop-up menu. ** There is no limit on the number of files you add to a profile.
 Current Profile Name - This field is automatically populated and it displays the name of the currently selected profile.
 Remote Server URL - This should contain the URL for Syncrify server. If the server is listening on a port other than 80 or 443 (SSL port if you are using https), that value must be specified following a colon. The following are some examples of a valid URL
(NOTE: Replace these URLS with the machine IP where Syncrify Server is running) :
Remote Server URL - This should contain the URL for Syncrify server. If the server is listening on a port other than 80 or 443 (SSL port if you are using https), that value must be specified following a colon. The following are some examples of a valid URL
(NOTE: Replace these URLS with the machine IP where Syncrify Server is running) :- http://192.168.1.20 - Assumes server is listening on port 80
- https://192.168.1.20 - Assumes server is listening on port 443
- http://192.168.1.20:5800 - Assumes server is listening on port 5800
- http://backup - Referring by server's host name. Ensure you are able to ping the server by its name before using this value. In this case server is listening on port 80.
- http://files.yourCompany.com - This uses the fully qualified name of the server. Ensure you are able to ping the server by its name.
- https://backup.yourCompany.com - This uses HTTPS as the protocol and uses a fully qualified domain name for the server.
 Login Email - The email address that the administrator assigned to this User via Syncrify Server.
  Login Password - The password for the user.