Requirements
WinSQL is a 32-bit program and will only run on Windows 95, 98, NT, Windows 2000 and above. It uses ODBC to connect to any target database for which a driver is available. WinSQL requires that you use version 3.x or higher as the ODBC Manager. Although, version 3.x is required for the Manager, you can use a driver that is compliant with version 2.x. However, if you use an older driver, you may not be able to use all of the features of WinSQL.
Installation and setup
Depending on the edition and package of WinSQL, you may have different installer files. The table below summarizes all their names and purpose.
Table 1
|
File Name |
Purpose |
|
winsqlProWDriver_Installer.zip |
An installation program for WinSQL Professional with ODBC Driver. Extract the setup executable from the zipped file and follow instructions on the screen to install WinSQL using this file. If you do not wish to install the ODBC Drivers, select custom installation and choose appropriate option. |
|
winsqlpOdbc.zip |
This is a zipped file that contains all necessary executables and ODBC drivers. However, it does not come with an installer. You have to manually copy these files into a directory of your choice and create necessary shortcut icons. |
|
winsqlLiteWDriver_Installer.zip |
An installation program for WinSQL Lite with ODBC Driver. Extract the setup executable from the zipped file and follow instructions on the screen. If you do not wish to install the ODBC drivers, select custom installation and choose appropriate option. |
|
winsqlOdbc.zip |
This is a zipped file that contains all necessary executables and ODBC drivers. However, it does not come with an installer. You have to manually copy these files into a directory of your choice and create necessary shortcut icons. |
Registering WinSQL ODBC Drivers
This step is necessary if you need to use the ODBC drivers that come with WinSQL – the registration process configures the drivers so that they appear in ODBC Manager in Windows Control Panel. You may skip this section if you are not using WinSQL Lite/Professional with ODBC.
You will be prompted to configure the ODBC drivers first time you run the WinSQL. If you need to re-register on un-register these drivers in the future, click “Register ODBC Drivers…” under the help menu.
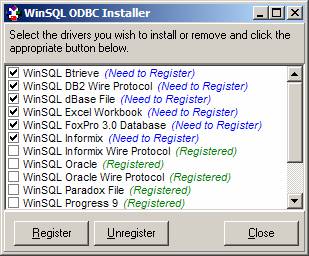
The ODBC Installer window lists all the available drivers that come with WinSQL. The installation status is displayed next to the name of every driver. You may choose to register only the drivers that you want to use or select all of them. We recommend that you register all the drivers.
When you Un-Register any driver, all the associated DSN will also be removed.
Uninstalling WinSQL
Follow the steps below to uninstall WinSQL.
1. If you registered ODBC drivers in WinSQL, you must un-register them before running uninstaller. This removes the ODBC driver names from control panel. Failure to do so may remove the files but won’t remove registry entries.
2. From control panel run “Add Remove Programs” and uninstall WinSQL
Relatively speaking, configuring ODBC and creating and data source name is probably the most difficult part in the whole setup. However, most likely since programmers, DBAs and system administrators will use this tool, most of the users would already know how to do it.
Opening the ODBC administrator
Double click the ODBC32 icon in the control panel to start the ODBC Manager. Remember you can only use version 3.x or above in order to connect to the databases. You can confirm the version of manager by clicking on the “About” tab on the administrator. You can download the latest version from http://www.microsoft.com/data/odbc
Different kinds of DSN
You can create three different kinds of data source names.
User DSN
These data sources are local to a computer, and may only be used by the current user.
System DSN
These data sources are local to a computer, rather than dedicated to a user. The system, or any user having privileges, can use a data source set up with a system DSN.
File DSN
These are file-based data sources that may be shared between all users that have the same drivers installed, so have access to the database. These data sources are not dedicated to a user and are not machine specific. WinSQL does not support File DSNs.
Creating a new DSN
Depending on your needs you can decide what type of DNS would be suitable for you. In the example below we will create a System DSN that will point to an MS SQL Server database.
¨
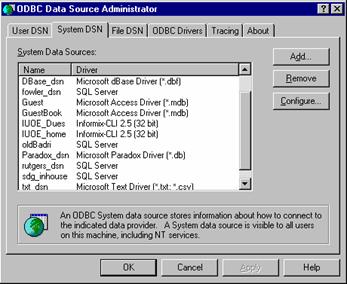
Click on the System DSN tab in the Data Source Administrator
¨ Click the Add… button to add a new DSN.
¨ The next screen will display all the available ODBC drivers that you have installed on the machine. For this example, select SQL Server.
¨
Please note that screen in the next step may differ from driver to driver. For
this example we are using version 2.65 of Microsoft SQL Server driver.
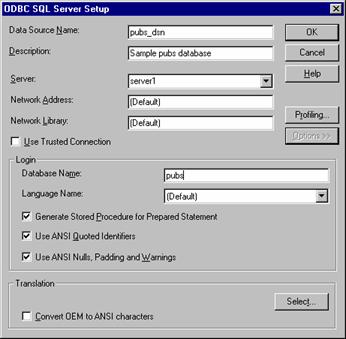
¨ Click the Ok button when done.
Establishing connection to a back-end database
Once you have created a DSN, you should be able to run SQL queries against the database. First you have to connect to a database. You will see the newly created DSN in the database connection box of WinSQL.
DSN-Less Connections
Starting with Version 4.0, you are not required to create a DSN before establishing connection. Check the “Specify connection string” box to specify the connection string.
Connection string is a set of connection parameters that tell WinSQL how to connect to a remote database. If you are not sure what to type here, delete everything from the text box and click ok. The ODBC Driver manager window will appear and you can select which data source you want to connect to. WinSQL captures the connection string that is used by the ODBC Driver manager and saves it for future use. Next time you try the establish connection, the text box will be filled for you.

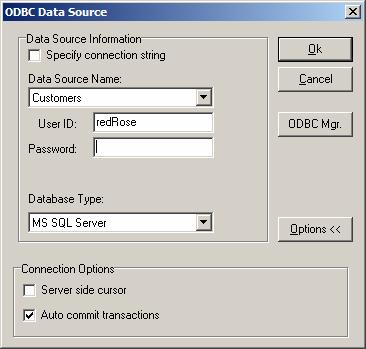
Connection options
Database Type
This is the type of Database you are trying to connect. The list to databases that you see in this combo box depends on Database plug-in that are discovered by WinSQL at start time. Therefore, it is only available in WinSQL Professional and if WinSQL finds a Database plug-in.
IMPORTANT: If you do not see a database that you are trying to connect in this list, it does NOT mean that you cannot connect to that data source from WinSQL. It means that WinSQL will not be able to query some database specific features like triggers and SQL Scripts for Views and Stored Procedures.
A detail description of WinSQL Plug-ins is provided later in this manual.
Server side cursor
Some databases like MS SQL Server and Sybase does not allow opening multiple statements at the same time unless a server side cursor is used. Although, WinSQL does not use multiple statements, some implementation of the driver might require server side cursors. This will degrade the performance of the queries and therefore, if you are not sure, leave this option unchecked.
Auto commit transactions
When checked, all the transactions will be automatically committed. Some databases, like Oracle, do not allow explicit transactions. Therefore, it may be useful to turn this option off which will allow you to manually COMMIT and ROLLBACK any transaction.
When this option is OFF, a red indicator appears on the status bar. This is to remind you to COMMIT or ROLLBACK before closing the connection.
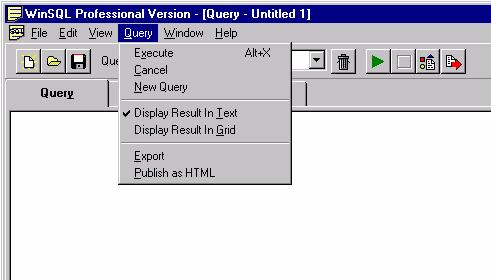
Running Queries
Once the connection is established, you can write any SQL statement and click the play button to run it.

You can highlight part of the script to run or do no highlight anything to run the complete script. If there are more than one results, WinSQL will display them one after another in different tabs.
Opening more than one query sets
You can open as many query sets as you want. The number is limited only by available memory on the machine. Click the “New Query Page” button on the screen to create a new query set. You can go back to the previous one by selecting it from the combo box. Starting from version 2, query set saves both the contents of the query tab as well as the results tab.
Creating more query sets helps you manage queries when your SQL script gets larger.
Query Set Workbook
If you have more than one query set created in WinSQL, all of them can be saved as a query workbook
Displaying results in Grid or Text
The program allows you to display text in two formats:
· Grid control
· Text control
Comments
WinSQL recognizes two kinds of comments:
¨ Line Comment if a line starts with two dashes, it is treated as a comment line
¨ Enclosed Comment Any text that is enclosed by /* */
Starting from version 3.5 you have an option of letting WinSQL parse the comments before the SQL statement is submitted to the server. This allows you to use comments even if the back-end database does not support them.
We recommended that you let the DBMS handle comments if they are supported. This option can be changed by selecting Edità Options from the menu.
SQL syntax
WinSQL does not have syntax of its own. It submits the query as-is to the back-end database with a few exceptions. These exceptions occur in case of Parameterized queries and comments.
Catalog Tip
Starting with version 3.9, pressing CTRL-Space in the query window invokes a Catalog tip, which contains table and field names.
The data that you see in the table tip comes from the catalog window and therefore, any filter that you have specified in the catalog window will apply to the Catalog tip as well.
In order to see the fields for a table, press F2 or click the right mouse button and select toggle. You can select multiple entries by holding the CTRL key and clicking the entries. In order to close the tip box hit the ENTER key or double click the any selected entry. If you have selected multiple fields, they will appear as comma separated values in the query window.
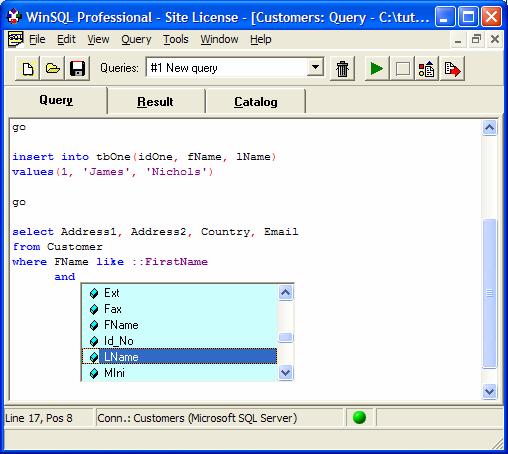
Parameterized queries
Starting from version 2.0, WinSQL can accept parameters in the queries. Any text that is following by two colons is considered as a parameter and the user can supply the value for that parameter when the query is run. WinSQL remembers the values for the old parameters so that the user does not have to type them every time.
Tip: Once you have specified a value
for the first parameter, you can hit ENTER to move to the next one. WinSQL,
will try to determine the data type for the parameter. You can change the
default data type by selecting one from the list.
Important: You cannot use parameterized queries to export data.
Syntax highlighting
WinSQL will highlight the text appropriately as you type your SQL statements. If you like to change the format, select “Syntax Highlighting” from the edit menu.
Limitation
The result is limited to 32767 characters per field when the data is displayed in a grid control and 4096 characters when displayed in the text control. Therefore, the data will get truncated if you run a select statement that has one or more fields of type BLOB. This will not happen if you try to export the field to another database.
SQL Wizard
Available in WinSQL Professional, SQL Wizard allow you create SQL queries with mouse clicks. To invoke the wizard, select “SQL Query Wizard” under the tools menu.
SQL Wizard allow you to pick table(s) that you wish to query, select the fields, apply any filter conditions and let WinSQL create the SQL for you.
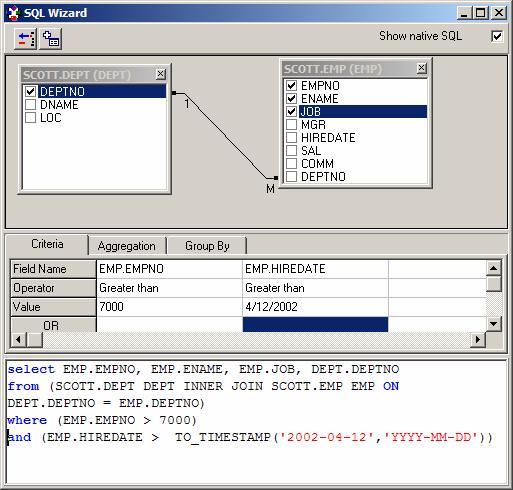
This wizard determines the referential integrity constraints specified against any table and draw appropriate relationships. Please note that WinSQL may not be able to determine these constraints in certain case where the ODBC driver does not provide necessary information. One such driver is for MS Access.
Show native SQL
If this option is selected, WinSQL converts a generic ODBC specific SQL Scripts into a Database specific syntax. This conversion is done through the ODBC driver and therefore, depends on the capabilities of the driver.
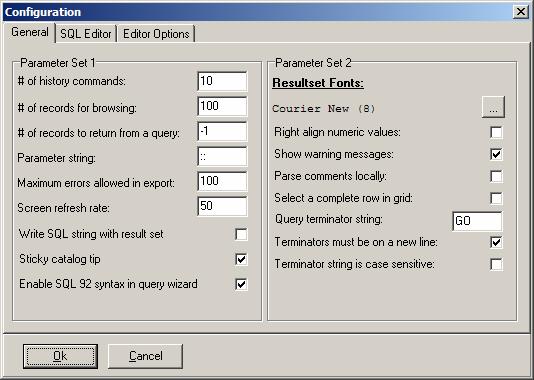
Configuration options
The configuration screen is invoked by selecting the Options menu item under the main Edit menu. This screen is provided to set different configuration that a user can change.
A detail for each option is provided below.
# of history command
This is a numeric value corresponding to the number of history entries WinSQL keeps in its memory. Whenever a query is run, the script is saved into a history buffer that acts as a Stack (last in first out). You can retrieve the scripts from this buffer at a later time by selected “Show History” item from the pop-up menu in the Query tab.
# of records for browsing
This is a numeric value corresponding to the number of records to display in the Browse Data feature available in the catalog window. The default value is 100.
Caution: If you set this value to a large number, WinSQL will fetch a large result set whenever the Browse Data item is clicked. This can potentially slow down not only your machine but can also have negative affects on your network. We suggest that you apply filter on the records if you rather than displaying all the records in a table.
# of records to
return from a query
This parameter limits the number of records that are returned from a SELECT statement. A value of -1, which is the default, signifies no limit.
Parameter string
This token string is used to specify a parameter in the query window. Default value for this field is :: -- Example. Following query contains FirstName as parameter
Select * from customer where fName = ::FirstName
When the user runs the above statement, WinSQL prompts for a parameter called FirstName.
Maximum errors
allowed in export
This parameter only applies to WinSQL Professional and specifies the number of errors before an export routine is terminated.
Screen refresh rate
Number of records to fetch before screen is painted. Applies when results are displayed in Text box.
Write SQL string
with result set
If checked, the SQL Statement is printed right before the result set. This is useful if you are displaying the result in the Text control.
Sticky catalog tip
If checked, the Catalog tip remembers its last entries.
Result set Fonts
Click the button to change the font of the result set window. Fonts for the query window are set through the Editor Option window accessible from EditàSyntax Highlighting under the main menu.
Right align numeric
values
If checked, all the numeric values in the result set will be right aligned. Applicable if the result set is displayed in a Text Mode
Show warning
messages
If checked, warning messages will be displayed. This is most useful if the database is either Sybase or MS SQL Server, however, can be used by other databases as well. We recommend that this box should be left checked.
Parse comments
locally
If checked, WinSQL will parse the query script and strip all the comments before submitting it to the backend database.
Select a complete
row in grid
If checked, user will not be able to select individual cells within the result grid, instead, all the columns for a row will be selected.
Query terminator
string
This string breaks the script in multiple parts and each part is sent separately to the database. The default value for this parameter is ‘GO’ and it works in conjunction with “Terminator must be on a new line” and “Terminator string is case sensitive” parameters.
Terminator must be
on a new line
If checked, a terminator string is only treated as a terminator if it appears on a new line.
Terminator string
is case sensitive
If checked, the terminator string becomes case sensitive.
Besides supporting all the functions that are supported by the back-end database, WinSQL also supports ODBC scalar functions. In most cases, you will not need to use these scalar functions since the back-end database usually has a richer set. However, in some cases, for instance when the source is a text file, you will find these functions extremely helpful.
How to use scalar functions
Following are the types of scalar functions:
· String functions
· Numeric functions
· Time and date functions
· System functions
The syntax for using scalar functions is as follows:
{fn FUNCTION_NAME( PARAMETERS ) }
The string {fn MUST precede the function name and a } must be followed after the close-parenthesis.
Example:
select {fn
SUBSTRING(first_name, 1, 3)}
FirstThree, first_Name
from
customers
where
cust_id = 1049
This query displays a result:
FirstThree
first_Name
----------
-------------------------
Den
Denzil
1 Row(s) affected
First field only displays the first 3 characters of the name.
Important: Your driver may not support all the functions listed below. Check the driver help file for a detail listing.
String functions
|
Function Name |
Description |
|
ASCII(string_exp) |
Returns the ASCII code value of the leftmost character of string_exp as an integer |
|
BIT_LENGTH(string_exp) |
Returns the length in bits of the string expression |
|
CHAR(code) |
Returns the character that has the ASCII code value specified by code. The value of code should be between 0 and 255; otherwise, the return value is data source-dependent. |
|
CONCAT(string_exp1, string_exp2) |
Returns a character string that is the result of concatenating string_exp2 to string_exp1. The resulting string is DBMS-dependent. For example, if the column represents by string_exp1 contained a NULL value, DB2 would return NULL, but SQL Server would return the non-NULL string. |
|
DIFFERENCE(string_exp1, string_exp2) |
Returns
an integer value that indicates the difference between the values returned by
the SOUNDEX function for string_exp1 and
string_exp2. |
|
INSERT(string_exp1, start, length,
string_exp2) |
Returns
a character string where length
characters have been deleted from string_exp1 beginning at start and where string_exp2 has been inserted into string_exp, beginning at the start. |
|
LCASE(string_exp) |
Returns a string equal to that in string_exp with all uppercase characters converted to lowercase. |
|
LEFT(string_exp, count) |
Returns
the leftmost count characters of string_exp. |
|
LENGTH(string_exp) |
Returns the number of characters in string_exp, excluding trailing blanks. |
|
LOCATE(string_exp1, string_exp2,
[start]) |
Returns the starting position of the first occurrence of string_exp1 within string_exp2. The search for the first occurrence of string_exp1 begins with the first character position in string_exp2 unless the optional argument, start, is specified. If start is specified, the search begins with the character position indicated by the value of start. The first character position in string_exp2 is indicated by the value 1. If string_exp1 is not found within string_exp2, the value 0 is returned. |
|
LTRIM(string_exp) |
Returns the characters of string_exp, with leading blanks removed. |
|
REPEAT(string_exp, count) |
Returns a character string composed of string_exp repeated count times. |
|
REPLACE(string_exp1, string_exp2,
string_exp3) |
Search string_exp1 for occurrences of string_exp2 and replace with string_exp3. |
|
RIGHT(string_exp, count) |
Returns the rightmost count characters of string_exp. |
|
RTIM(string_exp) |
Returns the characters of string_exp with trailing blanks removed. |
|
SOUNDEX(string_exp) |
Returns a data source – dependent character string representing the sound of the words in string_exp. For example, SQL Server returns a 4-digit SOUNDEX code; Oracle returns a phonetic representation of each word. |
|
SPACE(count) |
Returns a character string consisting of count spaces. |
|
SUBSTRING(string_exp, start, length) |
Returns a character string that is derived from string_exp beginning at the character position specified by start for length characters. |
|
UCASE(string_exp) |
Returns a string equal to that in string_exp with all lowercase characters converted to uppercase |
Numeric functions
|
Function Name |
Description |
|
ABS(numeric_exp) |
Returns
the absolute value of numeric_exp |
|
ACOS(float_exp) |
Returns the arccosine of float_exp as an angle, expressed in radians. |
|
ASIN(float_exp) |
Returns the arcsine of float_exp as an angle, expressed in radians. |
|
ATAN(float_exp) |
Returns the arctangent of float_exp as an angle, expressed in radians. |
|
ATAN2(float_exp1, float_exp2) |
Returns
the arctangent of the x and y coordinates, specified by float_exp1 and float_exp2. |
|
CEILING(numeric_exp) |
Returns the smallest integer greater than or equal to numeric_exp. |
|
COS(float_exp) |
Returns the cosine of float_exp, where float_exp is a angle expressed in radians. |
|
COT(float_exp) |
Returns the cotangent of float_exp, where float_exp is an angle expressed in radians. |
|
DEGREES(numeric_exp) |
Returns the number of degrees converted from numeric_exp radians. |
|
EXP(float_exp) |
Returns the exponential value of float_exp. |
|
FLOOR(numeric_exp) |
Returns the largest integer less than or equal to numeric_exp. |
|
LOG(float_exp) |
Returns the natural logarithm of float_exp. |
|
LOG10(float_exp) |
Returns the base 10 logarithm of float_exp. |
|
MOD(integer_exp1, integer_exp2) |
Returns the remainder (modulus) of integer_exp1 divided by integer_exp2. |
|
PI() |
Returns the constant value of pi as a floating point value. |
|
POWER(numeric_exp, integer_exp) |
Returns the value of numeric_exp to the power of integer_exp. |
|
RADIANS(numeric_exp) |
Returns the number of radians converted from numeric_exp degrees. |
|
|
Returns a random floating point value using integer_exp as the optional seed value. |
|
ROUND(numeric_exp, integer_exp) |
Returns numeric_exp rounded to integer_exp places right of the decimal point. If integer_exp is negative, numeric_exp is rounded to |integer_exp| places to the left of the decimal point. |
|
SIGN(numeric_exp) |
Returns an indicator of the sign of numeric_exp. If numeric_exp is less than zero, –1 is returned. If numeric_exp equals zero, 0 is returned. If numeric_exp is greater than zero, 1 is returned. |
|
SIN(float_exp) |
Returns the sine of float_exp, where float_exp is an angle expressed in radians. |
|
SQRT(float_exp) |
Returns the square root of float_exp. |
|
TAN(float_exp) |
Returns the tangent of float_exp, where float_exp is an angle expressed in radians. |
|
TRUNCATE(numeric_exp, integer_exp) |
Returns numeric_exp truncated to integer_exp places right of the decimal point. If integer_exp is negative, numeric_exp is truncated to |integer_exp| places to the left of the decimal point. |
Time, Date, and Interval functions
|
Function Name |
Description |
|
CURDATE() |
Returns the current date. |
|
CURTIME() |
Returns the current local time. |
|
DAYNAME(date_exp) |
Returns a character string containing the data source – specific name of the day (for example, Sunday through Saturday or Sun. through Sat. for a data source that uses English, or Sonntag through Samstag for a data source that uses German) for the day portion of date_exp. |
|
DAYOFMONTH(date_exp) |
Returns the day of the month based on the month field in date_exp as an integer value in the range of 1 – 31. |
|
DAYOFWEEK(date_exp) |
Returns the day of the week based on the week field in date_exp as an integer value in the range of 1 – 7, where 1 represents Sunday. |
|
DAYOFYEAR(date_exp) |
Returns the day of the year based on the year field in date_exp as an integer value in the range of 1 – 366. |
|
HOUR(time_exp) |
Returns the hour based on the hour field in time_exp as an integer value in the range of 0 – 23. |
|
MINUTE(time_exp) |
Returns the minute based on the minute field in time_exp as an integer value in the range of 0 – 59. |
|
MONTH(date_exp) |
Returns the month based on the month field in date_exp as an integer value in the range of 1 – 12. |
|
MONTHNAME(date_exp) |
Returns a character string containing the data source – specific name of the month (for example, January through December or Jan. through Dec. for a data source that uses English, or Januar through Dezember for a data source that uses German) for the month portion of date_exp. |
|
NOW() |
Returns current date and time as a timestamp value. |
|
QUARTER(date_exp) |
Returns the quarter in date_exp as an integer value in the range of 1 – 4, where 1 represents January 1 through March 31. |
|
SECOND(time_exp) |
Returns the second based on the second field in time_exp as an integer value in the range of 0 – 59. |
|
TIMESTAMPDIFF(interval, timestamp_exp1, timestamp_exp2) |
Returns the integer number of intervals of type interval by which timestamp_exp2 is greater than timestamp_exp1. Valid values of interval are the following keywords: SQL_TSI_FRAC_SECOND SQL_TSI_SECOND SQL_TSI_MINUTE SQL_TSI_HOUR SQL_TSI_DAY SQL_TSI_WEEK SQL_TSI_MONTH SQL_TSI_QUARTER SQL_TSI_YEAR where fractional seconds are expressed in billionths of a second. For example, the following SQL statement returns the name of each employee and the number of years he or she has been employed: SELECT NAME, {fn TIMESTAMPDIFF(SQL_TSI_YEAR, {fn CURDATE()}, HIRE_DATE)} FROM EMPLOYEES If either timestamp expression is a time value and interval specifies days, weeks, months, quarters, or years, the date portion of that timestamp is set to the current date before calculating the difference between the timestamps. If either timestamp expression is a date value and interval specifies fractional seconds, seconds, minutes, or hours, the time portion of that timestamp is set to 0 before calculating the difference between the timestamps. Important: Not all drivers support all of the intervals. |
|
WEEK(date_exp) |
Returns the week of the year based on the week field in date_exp as an integer value in the range of 1 – 53. |
|
YEAR(date_exp) |
Returns the year based on the year field in date_exp as an integer value. The range is data source – dependent. |
System functions
|
Function Name |
Description |
|
DATABASE() |
Returns the name of the database corresponding to the connection. |
|
IFNULL(exp_value) |
If exp is null, value is returned. If exp is not null, exp is returned. |
|
USER() |
Returns the user name in the DBMS. |
Viewing database catalog can be very handy when writing SQL statements. WinSQL displays this information is a hierarchical format.
Important: Catalog information depends heavily on the capability ODBC driver. WinSQL queries these drivers and finds out what information is available. For example the CLI drivers that comes with Informix client setup cannot display the parameters for a stored procedure.
Providing filters
In some situations where the number of tables is very high, it may take a long time to display all the tables and their fields. Catalog window provides two filtering parameters that can restrict the total number of objects displayed. These filters are:
· By user name - Will only display objects owned by this user
· By object name - Will only display objects where the name starts with the specified value
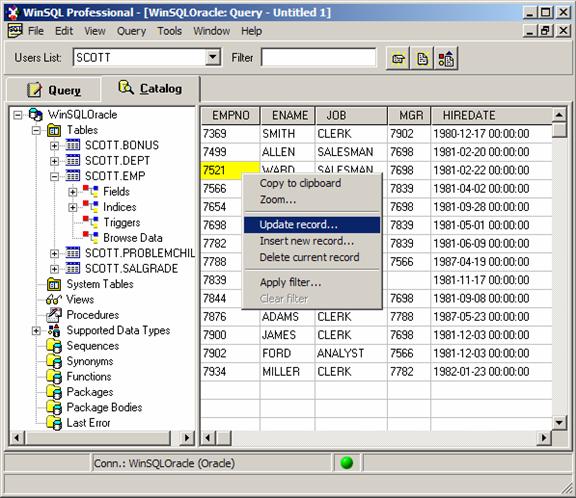
Browsing data
Click the "Browse Data" node to browse the first few records in a table or view. The default number of records is 100. However, this value can be changed in the Options dialog box.
Tip: Double click the header column to sort any row
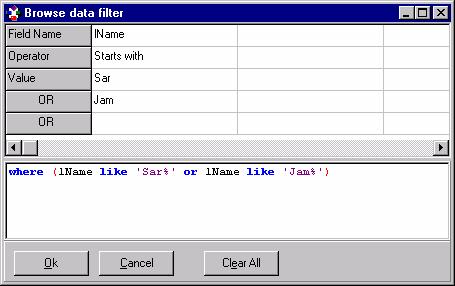
Applying Filter
You can restrict the records that appear in the browse data window by clicking the right mouse button and selecting “Apply Filter” on the data grid. This opens up a window that create the necessary where clause for the SELECT statement.
Sorting records
Simply click the header column of the grid control to sort the data. Click it again to reverse the order.
Using Insert / Update record wizard
Double click an existing row in the Browse Data grid to bring up the Update record wizard or an empty row to bring up the Insert wizard. You can also invoke this wizard by clicking the right mouse button and then selecting "Update record" from the pop-up menu.
This wizard allows the user to input the values in the grid and generates appropriate SQL script.
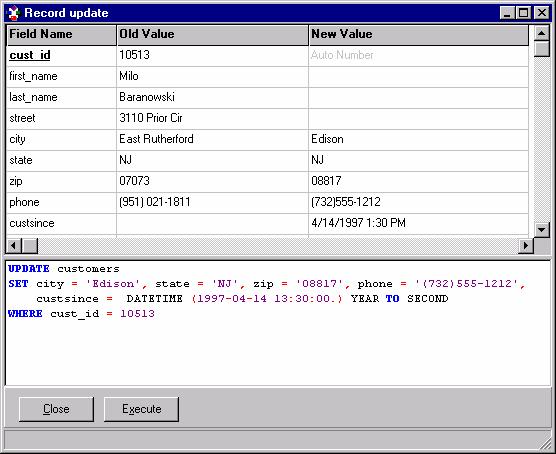
Using Strings and Dates in the wizard
WinSQL will automatically enclose the values with appropriate prefix and suffix characters. Therefore, when typing the values in the grid, you DO NOT have to enclose string values in quotes. Similarly, date can be entered in the format that is understood by your system. This format is specified in the "Regional Settings" available in Control Panel.
Example:
|
Column Name |
Data Type |
You Enter |
|
FirstName |
VARCHAR |
Sarah |
|
LastName |
VARCHAR |
$$NULL |
|
ID |
INT |
430 |
|
CustSince |
DATETIME |
|
Based on these values, WinSQL will generate the query as follows:
INSERT INTO customers(first_name, last_name, id, custsince)
VALUES
('Sarah', NULL, '430', DATETIME (1963-04-25
Notice that it appropriately encloses the string value and format the datetime field. This example assumes that the database is Informix and therefore, formatting is done accordingly.
Ignoring a field and NULL values
Double click any row to ignore it. When a row is ignore, text in all the columns get crossed out. In case of an INSERT, when a field is ignored, it will either put NULL or the default specified in the table.
If you wish to explicitly set the value to null, type $$NULL in the grid.
Executing Stored Procedures
You can execute and capture the result of a stored procedure using the Stored Procedure Wizard available in the Professional version. Select the stored procedure from the catalog window, click the right mouse button and select “Execute procedure” from the pop-up window.

Fill in the
appropriate input fields in the grid and click the execute button. After
execution, the output parameters will appear in the grid control in red.
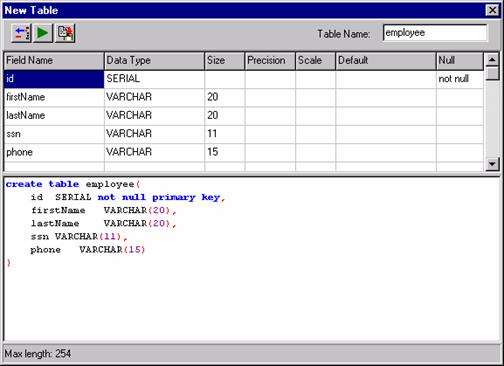
Using new table
wizard
You can open this wizard either by clicking the right mouse button in the catalog window or by clicking the speed button. This wizard allows you to type new fields and select their data types and based on the values, it generates the SQL statement for you. Once you have entered all the fields, you can modify the SQL statement to include additional information like primary key, foreign key or tablespace information.
Reverse Engineering a table design
You can generate the CREATE TABLE statement based on the schema. Please note that this string is limited to the capability of the ODBC driver and may not include all the properties of the table. For example, ODBC does not provide the information about table spaces and therefore, this information is not generated.
Click the right mouse button on the tree view control in the catalog window and select "Generate CREATE TABLE Statement" from the popup menu.
Printing
The catalog information can be printed through the printing wizard in WinSQL. By answering just a few questions, you can print the complete schema of a database in matter of minutes.
Starting from version 3.0, you can publish the result of an SQL query to linked HTML pages.
Export templates
You can create export templates files with WinSQL. Once these files are created, you can use them for future use. You will also need these files if you wish to run the export routines from Command line.
The HTML publishing has default values for all the required fields. This allows the user to hit the next button until the summary screen is visible.
Creating new HTML template
WinSQL exports data based on a SQL query. Therefore, you must select a query in the query tab before clicking the export button. You cannot use parameterized queries to publish HTML. Once you are satisfied with the SQL script, click the “Publish as HTML” button to start the Wizard.
Include files
WinSQL uses two files, header and footer, to enclose the exported data. This allows the user to format the output to suit their needs.
Rules for header file:
· The header file must have the beginning HTML tags including <html>, <title> <body> and others.
· The resultant data gets displayed into a table. Therefore, the header file must end with a <table> tag.
Rules for footer file:
· Footer file must have the ending tags of an HTML page.
· It must begin with a </table> tag.
Example
Header file
<html>
<head>
<title>SQL
query result</title>
</head>
<body bgcolor="#FFFFFF">
<!—You can add more data here -->
<div align="center"><center>
<table border="0" cellpadding="2">
Example
Footer file
</table></center></div></body></html>
Table header, rows and columns properties
The next screen allows you to specify the properties for table header, rows and columns. The value in these field must conform to HTML rules and must have a ::DATA parameter. ::DATA will get replaces by the actual value when the export routine is run.
Example:
Table
Header:
<th bgcolor="#000000"><font color="#FFFFFF">
::DATA </font></th>
Table
Rows
<tr BGCOLOR="#FFFFCC"> ::DATA </tr>
Table
Columns
<td> ::DATA </td>
Once all the necessary information has been entered, click the next button until you get to the summary screen. Click the Finish button to publish the results.
It is important to save the template if you need to run the publisher from a command prompt.
Using existing HTML template
Simply select an HTML export template ( HET )file and click next until you get to the summary screen. Click finish to publish the result.
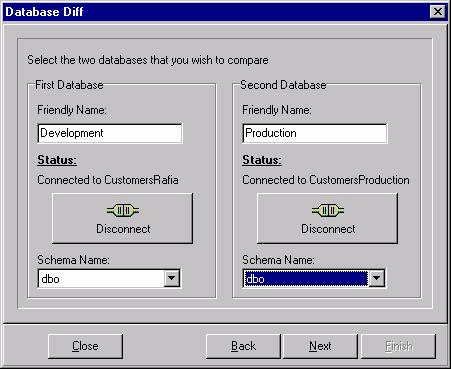
Database Diff feature in WinSQL Professional provides you a mechanism to compare schemas of two similar databases. For instance you can use WinSQL to compare the schema of a database used in a development environment with a similar database in production environment. This feature is available in WinSQL Professional only.
To start the comparison, select “Database Diff…” from the Tools menu. The following screen will show up.
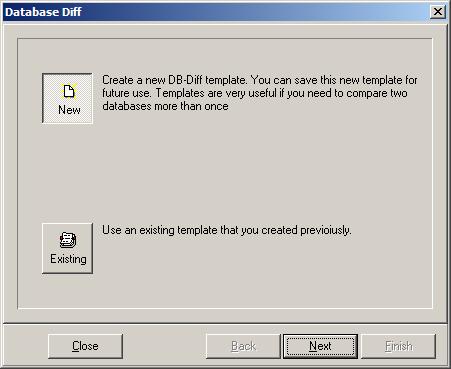
If this is the first time you are invoking the wizard select “New” template button. If you have a previously saved template available, you may select the “Existing” button.
Click next to proceed.
Here you need to establish connections with the two databases that you are trying to compare. Once the connection is established, the connection button will read “Disconnect” Refer to the screen shot below.
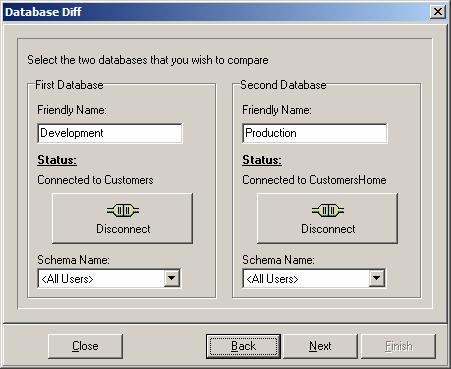
Click the next button to proceed
Understanding how objects are compared
When comparing two databases, WinSQL picks the first database and treats it as a pivot database, meaning it will examine all the objects in this database and will try to match it will the non-pivot database.
If “Run comparison with respect to both databases” is selected on the third step, WinSQL will run the comparison twice – once for each database as pivot.
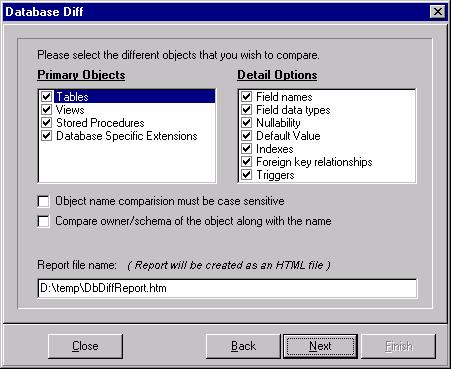
Primary Objects and
Detail Options
This list box displays all the objects that can be compared. On the right hand side you see individual options for the object selected on the left. For instance when you select Stored Procedures on the left, you see “Parameters”, “Parameter type”, “Procedure script”, “Show DDL if doesn’t match” on the right.
IMPORANT: You must select an appropriate database plugin at the time of connection in order for Database Diff to work correctly
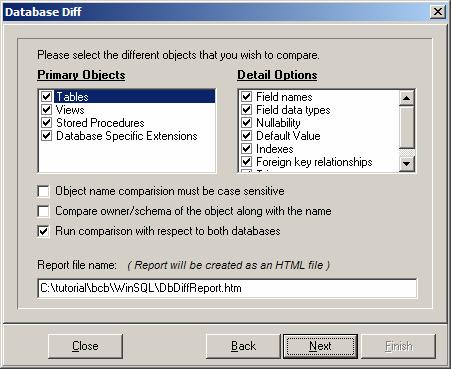
Generated Report
The output report is generated as an HTML file and is displayed using the HTML browser configured on your system. The next step accepts input parameter that specifies different output parameters.
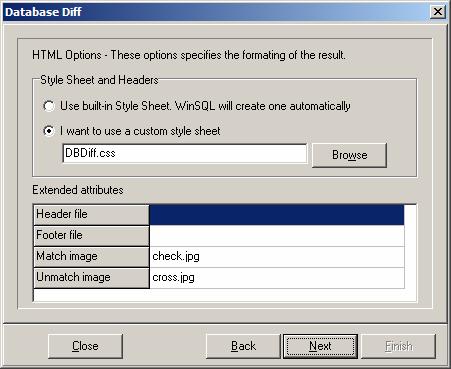
Use built-in style sheet – If this option is selected, the generated report will use a built-in style sheet for HTML rendering
Header/Footer file – If specified, WinSQL will use the text contained in the specified file as header and/or footer for the report. This is a convenient way to customize the look and feel of the generated report
Match/Unmatch image – This is the URL for the images in the report
Saving template
Like many other wizard in WinSQL, you have an option of saving all these steps as a template. This is a convenient way of running similar tasks again at a later time.
Finally, when you are satisfied with all the options, click the finish button to display the results.
Generating test data
Starting from version 3.5, WinSQL Professional allows you to create a test environment. This feature can be very useful when some random data is required during the development and testing phase of a project. Test data generation wizard allows you to create millions of rows of meaningful data into a database.
Starting the wizard
First, you must select the table in the catalog window for which you want to generate the data. Once the desired table is highlighted, you can either click the "Test data generation wizard" speed button or select it from the pop-up menu by clicking the right mouse button on the table name.
Example
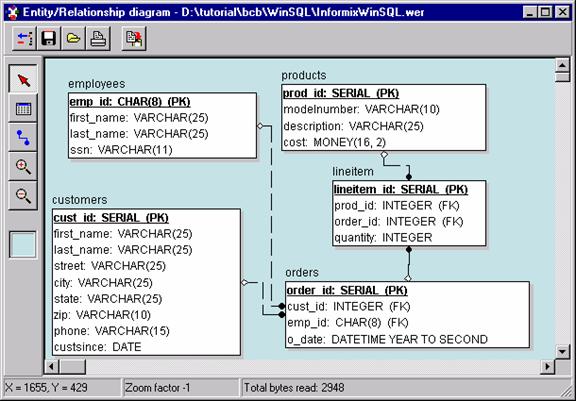
In order to understand all the steps easily, we will use an example database and will create test records in all the tables. The E-R diagram of the table is shown below.
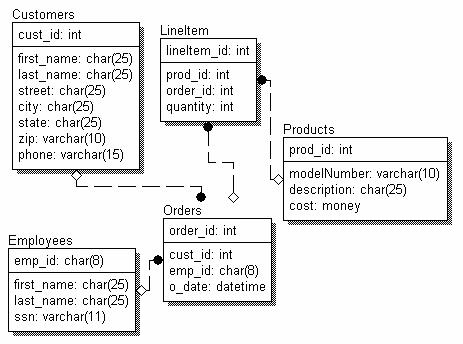
In our example, we have used Microsoft SQL Server 7.0 and therefore all the data types are shown accordingly.
Populating primary tables
Primary tables are those tables that do not have any foreign key constraints defined. Therefore, the data can be generated without depending on other entities. In our example, customers, employees and products fall into this category.
Let’s get started
First, select the "customer" table from the catalog window. Then click the right mouse button and select "Generate test data" from the popup menu.
The first screen asks you if you want to create a new template or use an existing one. Since we do not have an existing template, we will create a new one.
Note: The wizard has default values for all the required fields. Therefore, if you click the next button all the way through, WinSQL will generate about 1000 rows in the table that you selected.
Click the next button to go the second screen.
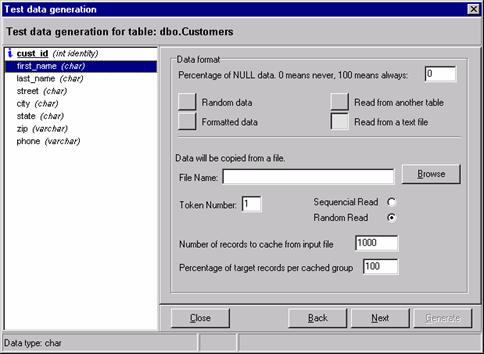
Use this screen to pick a field and select the data format that you wish to generate. All fields are listed on the left-hand side list box. There are four sources of data:
· Random
· Formatted
· A database table
· Text file
Random
This option will generate completely random data. Although the text will not make any sense, this is the fastest method to generate data. This is the default value for all the fields except if there is a unique index on the field, in which case unique numbers will be generated.
Formatted
This option allows you to select the format of the data. Depending on the data type of the field, available options can change. For instance if the data type is datetime, you can specify the starting and ending date. Moreover, you can also specify if you wish to include time along with date.
String Formats
Following table specifies the rules for specifying format for strings.
|
Keywords |
Description |
|
/ |
Escape character |
|
# |
Numeric values |
|
$ |
Uppercase characters only |
|
^ |
Lowercase characters only |
|
@ |
Alphanumeric with upper case letters |
|
% |
Alphanumeric with lower case letters |
|
~ |
Alphanumeric with mixed case letters |
|
|
|
|
* |
This character MUST appear at the end and it means that one or more characters can appear on the right hand side of the generated string |
A database table
This option is useful if you have a foreign key constraint define that references another table.
WinSQL queries the ODBC driver to find out if there are any foreign key constraints defined. If found, the program automatically selects this option with appropriate values for the fields. This feature however, depends heavily on the capabilities of the ODBC driver. For example the ODBC driver for MS Access does not return this information to the application and therefore users will manually have to specify these values.
Cached records
When records are read from either a table or text file, WinSQL reads a certain amount of rows in the memory. These records are called cached records. The default number of records in cache is 1000. Once enough records are generated, the program discards all the rows and refreshes the cache.
Percentage per cache
This is the percentage of total records that should be assign from a batch of cached records.
The following figure explains the concept graphically.
In the above example, we have to insert 1000 records in the target table and there are 1750 records in the input file/table. The specified percent cache is 40% which means that WinSQL will read 1000 rows from the table or text file and randomly pick records 400 values. Then, discard the cache data and fill it again with new values. However, the second time it comes around, there are only 750 records left in the input source. Therefore, the remaining 60% of the data will be created using the 750 records that are in the cache.
Text file
Use this option to read data from a text file. This text file MUST have one row per line and can have multiple columns separated by a | (pipe) character. You can either sequentially read the file or assign records randomly. In case of sequential read, there MUST be enough records in the input file. You can download WinSQL Option Pack that comes with sample text files from http://www.indus-soft.com/winsql
Token number
Data in one text file can be a
source for multiple columns. Consider the following scenario. You want to
insert city, state & zip information in a table. If these three fields came
from three different text files, there would be no relation between city, state
and zip. This can cause
Woodbridge|Virginia|22192
Palo Alto|California|94301
Now lets come back to our example. The first field, cust_id is a AGN (automatically generated number) for which the database is responsible for assigning values. It is recommended that you don’t change the values for this field.
The second and third fields are first name and last name respectively. We will use a sample data file (SDF) as a source for the data. You can either generate this file yourself or download the option pack from http://www.indus-soft.com that has sample files.
Highlight “firstName” from the list on the left-hand side. On the right, click “Read from a text file” button. Click the browse button to select FirstName.sdf. Leave the remaining fields to its default values. Next, select “lastName” and repeat the same procedure.
Now click “city” on the left and select “Read from text file” button. Select “cityState.sdf” as a source. Repeat the same procedure for “state” and “zip”, however, type 2 and 3 for token numbers.
Lastly, click “phone” in the list box. Select “Formatted Data” and pick “US Telephone Numbers” from the combo box. If you need any other format, you can add as many as you like by clicking the button right next to the combo box. Once satisfied with all the values, click the next button.
Number of records to generate
Next screen allows you to specify the number of records you wish to generate. There is no limit as to how many records you generate.
Important: If you chose the input source to be a text file for any field and also checked the sequential flag, you MUST have enough records in the SDF file or else WinSQL will start over from the beginning of the last batch and will create duplicate records.
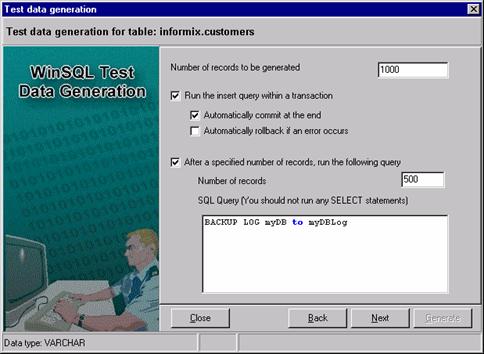
Transaction support
Optionally, you can generate data within a transaction. This allows you to ROLLBACK in case of any errors. By default, this option is off. Before turning this option on, you must refer to your database documentation regarding transaction support. Some databases, like Informix, allow you to temporarily disable transactions, in which case you will not be able use this feature.
Running queries while data is being generated
This feature allows you to run a query after a certain number of records are generated. This could be useful if you need to backup the transaction log so that more records can be inserted.
Repeat the above steps for employee and products tables.
Populating secondary tables
Once all the primary tables are populate, data to satisfy foreign keys relationship in the secondary tables is now present. You should follow the same steps to generate data for these except for one difference: Now you can select a table as an input source. If your ODBC driver supports foreign key functionality, WinSQL will automatically select appropriate input source that will point to a primary key in another table.
In our example, lineItem is the last table in the dependence-hierarchy since it depends on the orders table. Therefore, the next candidate for data generation should be the orders table.
Ignoring a field
If you need WinSQL to ignore a field for any particular reason, simply double click the column name in the list box. This will cross out its name and display it in a gray color.
Although ignoring a field is almost like setting the NULL percentage to 100, there can be situations where they can differ. Consider the following example:
You have a table that is defined as:
create table myTable(
id autoNumber
primary
key,
name varchar(30),
phone varchar(15)
)
In the case where the name fields is ignore, WinSQL will generate the following code:
insert into myTable(phone)
values("555-1212")
However, if the field is set to produce 100% NULL values, the generated SQL will look like:
insert into myTable(name, phone)
values(NULL, "555-1212")
In the above example it does not matter if the name field is ignore or set to NULL. In either case the output is same. However, if the table definition looked like following, there would be a difference.
create table myTable(
id autoNumber primary key,
name varchar(30),
phone varchar(15) default
'555-1212'
)
Select "Draw E/R Diagram" from the Tools menu to create a new E/R Diagram.
Toolbar buttons
|
Button |
Description |
|
|
Add New Table - Click here to display a list of Tables and Views in your database. In the list select and double click a table to add it in the diagram. |
|
|
|
|
|
Add New Relation - Creates a Master-Detail relationship between two tables. After you click this button, the mouse cursor changes to a hand. You MUST select the master table first and then the detail table. |
|
|
Zoom In - Click this button to enlarge the size of the image on the screen as well as the printed output. |
|
|
Zoom Out - Click this button to reduce the size of the image on the screen as well as the printed output. |
|
|
|
Saving and Reading the file
Click the save button to save the diagram to the disk. The default Extension for the file is .WER which stands for WinSQL E/R Diagram. Similarly, use the Open file button to read a previously created diagram.
Exporting data to a different data source can be a very useful feature for many users. WinSQL not only export the data but, to a certain extent, can even create the schema for you. Besides exporting normal fields like characters, integers and date-time, it can even export BLOB types to the target database.
Export templates
Starting from Version 2, you can create export templates files with WinSQL. Once these files are created, you can use them for future use. You will also need these files if you wish to run the export routines from Command line.
Starting a new export
WinSQL exports data based on a SQL query. Therefore, you must select a query in the query tab before clicking the export button. You cannot use parameterized queries to export data. Once you are satisfied with the SQL script, click the export button to start the Export Wizard.
Export Options:
¨
Export to
an external text file.
You can customize the export format in the following steps. These format
options include delimiters and headers. This option does not use ODBC to create
the text file. If you select to export data through this option, only 512
characters will get transferred for each field. If the size of the field is
greater than 512 bytes, it will get truncated. Therefore, this is not a good
choice to transfer BLOB fields.
¨
Export to
an existing table.
Use this option if the table already exist in the target database. If you are
trying to export the data in the same database, consider using an SQL UPDATE
statement rather than using the Export Wizard.
¨
Export to
a new table.
Use this option if the table does not exist in the target database. WinSQL will
put together the CREATE TABLE statement matching the data types as close as
possible. You can manipulate the generated script to add constraints or change
the data types.
Creating a new table in the target database
If you decide to export the data into a new table, WinSQL can generate the SQL for you.

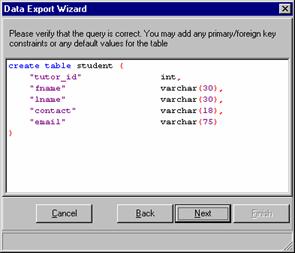
WinSQL tries to match the data types as close as possible. However sometimes you might want to change the type for any reason. Furthermore, you can add any referential integrity constraints you wish.
Matching the source and target fields
It is very important that the order of source and the target fields have a one-to-one correspondence.

Use the arrow buttons to move a target field up or down until it matches with the corresponding source field. If the fields don’t match, either the data will get exported to incorrect columns or the export process will fail. By double clicking a row you can exclude a column from the data transfer.
Saving the export template
Once you are satisfied with all the options and settings, you can save the template file for future use. If you specify a file name that already exists, WinSQL will overwrite the file with the new format.
Using existing templates
Using an existing template is pretty straightforward. Select a WinSQL template file (WET), and click the next button and finally the finish button.
Important: If you are using an existing template that was created on some other machine, make sure that both the source and target DSN exists
Export template embeds all the necessary information to connect to the source as well as target database. Therefore, when you run an export routine from command line you do not need to provide the connection string parameters. However, there may be times when you need to modify this file, for instance when the database password gets changed. You can use this editor to modify the file. Select "Export Template File Editor" from the Tools menu to open up the editor and then load appropriate .wet file.
IMPORTANT: Changing the .wet file incorrectly may corrupt the transfer routine. Therefore, avoid changing the SQL statement in the template.
Starting from Version 2.0 WinSQL supports extensive command line options, which makes WinSQL a very useful utility. You can both run an SQL script that is saved in a file or run an export task. This way WinSQL can be executed from a DOS batch file or a scheduler that can run external task.
If your back-end server support external command, you can even call WinSQL from a stored procedure or trigger. For example you can use the xp_cmdshell stored procedure in Sybase to launch WinSQL to export data to an Informix database.
Usage:
WinSQL <filename> | <option-Value>
¨ filename This is the name of an text file holding the SQL script. This will just open the text file in the editor but will not run it.
¨ option-Value Using these pair of option-value, you can run an SQL query against the database. Refer the following table for a complete listing of the options.
|
Options |
Value |
Meaning |
|
-a |
NULL |
Close WinSQL automatically after the task is complete. |
|
-d |
DSN Name |
Contains the name of the ODBC DSN. If there is a space in the name, it must be enclosed in quotes. |
|
-g |
NULL |
Runs WinSQL in debug mode. Will create a debug.log file that can be used to pin point any potential problem. |
|
-o |
Output file |
This file is used to store any error messages or data returned from the server as a result of a query execution. If this option is not specified, there will be no output generated. |
|
-q |
Query File |
Name of the file that holds the SQL query. |
|
-p |
Password |
User password for database connection |
|
-u |
User Name |
User name for database connection |
|
-x |
Export template |
Name of the export template file. |
|
-h |
Publish HTML |
Name of the HTML template file |
|
-? |
NULL |
Displays a help dialog box displaying all the command line options |
Examples
Following example shows how to run any SQL query from the command line. It will open a file called "updateStudents.sql" and connect to the database using specified DSN, User Name, and Password. All the error messages or any output data will go to "output.txt" file and WinSQL will close itself once the query is complete.
WinSQL "-dStudent DSN" –uAdmin –pAdmin –qc:\updateStudents.sql –oc:\output.txt -a
Following example just open a file in the editor. It does not run it.
WinSQL c:\student.sql
Following example export the data based on a template file "StudentTemplate.wet"
WinSQL –xStudentTemplate.wet
Notice that you do not have to provide a user id, password and dsn name when specifying a template file. This is because all this information is embedded in the file itself. If you need to change any parameters in the template file, use the Export Template File Editor under the Tools menu.
Important: There should not be any space between the option and its value
Limitation: You can only run one SQL statement from the command prompt. If you have multiple statements separated by a terminator, it could generate errors and the query may not run.
Incorrect usage
Following examples are incorrect.
Example 1.
WinSQL –xStudentTemplate.wet –dStudentDSN –uAdmin –pAdmin
You cannot specify any other parameter along with –x. The template file stores all the necessary connection parameters.
Example 2
WinSQL –dStudentDSN –uAdmin –qc:\updateStudents.sql –oc:\output.txt -a
Here the –p option for password is not specified. If WinSQL does not see a –p option, it will prompt the user by displaying a dialog box. If the password is blank or your database does not need a password, you must still provide this parameter with no value specified.
Plug-in enhances the capability of WinSQL. ODBC is a generic API and therefore, does not support database specific functions. Most of this functionality is achieved by querying system tables (also known as system catalog) in the back-end database. Plug-in provides the script for these queries, which are in plain text and in XML format.
XML is becoming the de facto standard for configuration files and to store small documents. Many programmers and system administrators are already familiar with its semantics and syntax. Therefore, WinSQL uses XML to create plug-ins, which makes its editing very easy.
The following shows a complete example of a plug-in for Oracle 8i.
<?xml version="1.0" encoding="iso-8859-1" ?>
<WinSQLDatabaseType dbName="Oracle 8" dbAlias="Oracle 8i"
version="3.8">
<view
supported="yes">
<viewDDL
supported="yes">
<query>
<sqlString>
<![CDATA[
select text from ALL_VIEWS
where OWNER = ? and VIEW_NAME = ?
]]>
</sqlString>
<paramList>
<param position="1" datatype="VARCHAR2"
value="WinSQL_SCHEMA" tag="1"/>
<param position="2" datatype="VARCHAR2"
value="WinSQL_OBJNAME" tag="1"/>
</paramList>
</query>
</viewDDL>
</view>
<!-- The
storedProcedure element tells WinSQL how to process a
Stored procedure -->
<storedProcedures
supported="yes">
<storedProcDDL
supported="yes">
<query>
<sqlString><![CDATA[
select TEXT
From SYS.ALL_SOURCE
Where TYPE = 'PROCEDURE' And OWNER = ? And NAME = ?
order by line
]]></sqlString>
<paramList>
<param position="1" datatype="VARCHAR2"
value="WinSQL_SCHEMA" tag="1"/>
<param position="2" datatype="VARCHAR2"
value="WinSQL_OBJNAME" tag="1"/>
</paramList>
</query>
</storedProcDDL>
</storedProcedures>
<triggers
supported="yes">
<triggerDDL
supported="yes">
<query>
<sqlString><![CDATA[
select TRIGGER_NAME, 'E', 'CREATE TRIGGER ' || DESCRIPTION,
TRIGGER_BODY
from ALL_TRIGGERS
where OWNER = ? and TABLE_NAME = ?
]]></sqlString>
<paramList>
<param position="1" datatype="VARCHAR2"
value="WinSQL_SCHEMA"
tag="1"/>
<param position="2" datatype="VARCHAR2"
value="WinSQL_OBJNAME"
tag="1"/>
</paramList>
</query>
</triggerDDL>
</triggers>
<extendedNodes>
<extension
level="1" name="Sequences" displayType="WinSQL_TreeView"
hasChildren="yes" useInDBDiff="no">
<query>
<sqlString><![CDATA[
select SEQUENCE_OWNER ||
'.' || SEQUENCE_NAME,
sequence_name, sequence_owner
from SYS.ALL_SEQUENCES where SEQUENCE_OWNER like ?
order by SEQUENCE_OWNER, SEQUENCE_NAME
]]></sqlString>
<!-- Level 1
extensions can ONLY have WinSQL_SCHEMA as a
parameter -->
<paramList>
<param position="1" datatype="VARCHAR2"
value="WinSQL_SCHEMA"
tag="1"/>
</paramList>
</query>
<extension level="2" name="Sequence Detail"
displayType="WinSQL_ListView"
hasChildren="no" useInDBDiff="no">
<query>
<sqlString><![CDATA[
select * from ALL_SEQUENCES
where SEQUENCE_OWNER = ?
and SEQUENCE_NAME = ?
]]></sqlString>
<paramList>
<param
position="1" datatype="VARCHAR2"
value="WinSQL_PARENTVALUE"
tag="3"/>
<param position="1" datatype="VARCHAR2"
value="WinSQL_PARENTVALUE"
tag="2"/>
</paramList>
</query>
</extension>
</extension>
<extension
level="1" name="Last Error" displayType="WinSQL_TreeView"
hasChildren="yes" useInDBDiff="no">
<query>
<sqlString><![CDATA[
select distinct NAME from SYS.ALL_ERRORS
]]></sqlString>
<!-- Level 1
extensions can ONLY have WinSQL_SCHEMA as a
parameter -->
<paramList> </paramList>
</query>
<extension level="2" name="Error Detail"
displayType="WinSQL_GridView"
hasChildren="no" useInDBDiff="no">
<query>
<sqlString><![CDATA[
select * from ALL_ERRORS where NAME = ? order by SEQUENCE
]]></sqlString>
<paramList>
<param position="1" datatype="VARCHAR2"
value="WinSQL_PARENTVALUE"
tag="1"/>
</paramList>
</query>
</extension>
</extension>
</extendedNodes>
</WinSQLDatabaseType>
The example shows the basic outline of the document. The root element is WinSQLDatabaseType, which has four subelements: view, storedProcedures, triggers and extensions. The elements are described in more detail below.
Plug-in Elements
Element
name: <view>
This node gets the SQL query that was used to generate the view.
Children node(s) - viewDDL
|
Attribute name |
Description |
|
supported |
Can be “yes” or “no. If views are supported, this value must be “yes”. The value is case sensitive. |
Element
name: <viewDDL>
Children node(s) – query
|
Attribute name |
Description |
|
supported |
Can be “yes” or “no. If querying a system table can return the script for a view, this value should be “yes”. The value is case sensitive. |
Element
name: <storedProcedure>
Children node(s) - storedProcDDL
|
Attribute name |
Description |
|
supported |
Can be “yes” or “no. If stored procedures are supported, this value must be “yes”. The value is case sensitive. |
Element
name: <storedProcDDL>
Children node(s) - query
|
Attribute name |
Description |
|
supported |
Can be “yes” or “no. If querying a system table can return the script for a stored procedure, this value should be “yes”. The value is case sensitive. |
Element
name: <triggers>
Children node(s) - triggerDDL
|
Attribute name |
Description |
|
supported |
Can be “yes” or “no. If triggers are supported, this value must be “yes”. The value is case sensitive. |
Element
name: <triggerDDL>
This node holds the query node required to get the information regarding the triggers on a database.
Children node(s) - query
|
Attribute name |
Description |
Children nodes |
|
supported |
Can be “yes” or “no. If querying a system table can return the script for a trigger, this value should be “yes”. The value is case sensitive. |
storedProcDDL |
Element
name: <query>
This element is used in many places within the document. It is used to specify an SQL statement that is run against the database to fetch any data. Below is a snippet from the XML document. This snippet contains <query>, <sqlString> and <paramList> nodes
<query>
<sqlString>
<![CDATA[
select text from ALL_VIEWS
where OWNER = ? and VIEW_NAME = ?
]]>
</sqlString>
<paramList>
<param position="1" datatype="VARCHAR2"
value="WinSQL_SCHEMA" tag="1"/>
<param position="2" datatype="VARCHAR2"
value="WinSQL_OBJNAME" tag="1"/>
</paramList>
</query>
Children node(s) - sqlString, paramList
|
Attribute name |
Description |
|
none |
|
Element
name: <sqlString>
Holds the SQL query within a CDATA section. Run time parameters are specified by a ?.
SQL string for views and stored
procedures
This query should only return 1 column. If more than one column is returned, the remaining columns will be ignored. Concatenating all the rows will create the value of the script.
SQL string for triggers
In case of triggers, this query should return 3 columns. The first columns should be the name of the trigger. If names are not supported, query must return ‘Not Available’. The second column is the type of trigger. It could be Update, Delete or Insert. The third column is the text containing the SQL script
SQL string for extension
There are two kinds of extensions. Level 1 and level 2. In case of level 1, there can be only one parameter, which is the schema or the owner of the object. The number of columns returned by the query depends on the display type of the extension. Refer to displayType node for further details.
|
Attribute name |
Description |
|
none |
|
Element
name: <paramList>
Holds the param node
Children node(s) - param
|
Attribute name |
Description |
|
None |
|
Element
name: <param>
Holds information regarding the parameter of the query.
|
Attribute name |
Description |
|
position |
This is a numeric value that represents the parameter number, which starts from 1 |
|
dataType |
This is the data type of the
parameter. It MUST be a valid datatype of the backend database. You can get a
list of valid datatypes from the catalog tab of WinSQL. For example if you
are changing the plug-in for MS SQL Server and one of the datatype is a CHAR,
writing CHARACTER instead of CHAR will generate errors. |
|
value |
This signifies the meaning of the parameter. It tells WinSQL where to get the value at run time. Possible entries are: WinSQL_SCHEMA – This is owner of the object WinSQL_OBJNAME – This is the name of the object WinSQL_FULLOBJNAME – This is the schema followed by a period and the name of the object WinSQL_PARENTVALUE – This value is only useful in the extension node where level is 2. This is the result from a parent query. The tag attribute specifies the column number. |
|
tag |
This attribute is only useful in the extension node where level is 2. This specifies the column number of the parent query. |
Extension nodes
Extension nodes provide the SQL statement to fetch database specific feature like sequences in Oracle. There are two kinds of extension nodes:
v Level 1
v Level 2
When a user clicks on the Tree View control on the left of the catalog tab, level 1 query gets executed. Level 2 provides a drill-down query for level 1.
Following code is an extract of the extension node from the example above.
<extension level="1" name="Last Error" displayType="WinSQL_TreeView"
hasChildren="yes" useInDBDiff="no">
<query>
<sqlString><![CDATA[
select distinct NAME from SYS.ALL_ERRORS
]]></sqlString>
<!-- Level 1 extensions can ONLY have
WinSQL_SCHEMA as a parameter -->
<paramList> </paramList>
</query>
<extension level="2" name="Error Detail"
displayType="WinSQL_GridView" hasChildren="no" useInDBDiff="no">
<query>
<sqlString><![CDATA[
select * from ALL_ERRORS where NAME = ? order by SEQUENCE
]]></sqlString>
<paramList>
<param position="1" datatype="VARCHAR2"
value="WinSQL_PARENTVALUE" tag="1"/>
</paramList>
</query>
</extension>
</extension>
First lets examine the attributes of the <extension> element.
|
Attribute name |
Description |
|
level |
This is the level number of the
extension. It must be either 1 or 2 |
|
name |
This is only valid for level 1. It is the text that appears in the tree view control in the catalog tab
|
|
displayType |
This is the target for the query result. There are four possible values for this attribute: WinSQL_TreeView – Use this to display results in tree view control, which appears on the left-hand side of the catalog window. Only the first the column is displayed in the window. However, the query can return more than one column. This is useful if you want to use data from the second column to appear in the WHERE clause of level 2 query. WinSQL_GridView – Use this to display results in a grid control, which appears on the right-hand side of the catalog window. The query can return as many rows and columns that are necessary. Field name will be displayed as column headers WinSQL_ListView – Use this to display results in a list view control, which appears on the right-hand side of the catalog window. The query can only return one row of data. If more rows are returned, their results will be discarded. WinSQL_TextView – Use this to display results in a text box. The query can only return 1 column but multiple rows. The result of every row is concatenated with the previous row. This is useful to display SQL queries. |
|
hasChildren |
Can be either “yes” or “no”. A yes means that there is a level 2 extension for this node |
|
useInDBDiff |
Can be either “yes” or “no”. If yes, it means that this extension will be used DBDiff report. |
This feature allows you to compare the schema of two databases. This feature is very useful if you have more than one database in your environment. WinSQL creates a report in HTML format that describes the differences.
IMPORTANT: The report created is a one-way report, meaning it compares the first database, called a pivot, with the second. Consider the following example where we have two databases called development and production.
|
|
|
In the example above, if the development database is selected first and made a pivot database, the report will be generated with respect to the development database. In other words it will only report objects that exist in Development but are missing or does not match in Production database. Therefore, it will report that contract table is missing from Production, but will not report the existence of employee table and empid field in orders table.
Tip: If you need to generate a two-way report, simply run the wizard twice and switch the order of the databases.
How does it work
Start the wizard by selecting “Database Diff” from the tools menu. Select the new template button and click next.
Tip: Remember to select the correct database type if a plug-in is available
The first database is considered the pivot DB.
Click on the connection
buttons to establish a database connection. Select the user name if required
and click Next.
Select appropriate options and the target HTML file. Click Next when done.

WinSQL uses Cascading Style Sheets to format the HTML report, which is a very convenient way of modifying the look and feel of the report. You have an option of using a built-in style sheet or specify an external sheet.
IMPORTANT: File names specified in this screen must use relative path with respect to the output HTML file. For example if the output HTML file is in the folder C:\MyReports\DBDiff.htm, DBDiff.css, check.jpg and cross.jpg must also be in the same folder.
Extended Attributes
These are optional attributes that you could specify that modify the look and feel of the HTML report. The table below summarizes these options.
|
Attribute |
Purpose |
|
Header file |
If this option is specified, WinSQL will omit the <HTML> and <BODY> tags and will replace it with the contents of this file. |
|
Footer file |
If this option is specified, WinSQL will omit the </HTML> and </BODY> tags and will replace it with the contents of this file. |
|
Match image |
This must point to an image file that will be used to display a matching condition. It should be a small image, approximately 16 x 16 pixels in either GIF or JPEG format. |
|
Mismatch image |
This must point to an image file that will be used to display a mismatching condition. It should be a small image, approximately 16 x 16 pixels in either GIF or JPEG format. |
Once finished inserting the values, click next. Verify the options on the summary screen and again click Next. At the last screen, you have an option of saving all the steps as a template. Finally, click Finish to run the report.